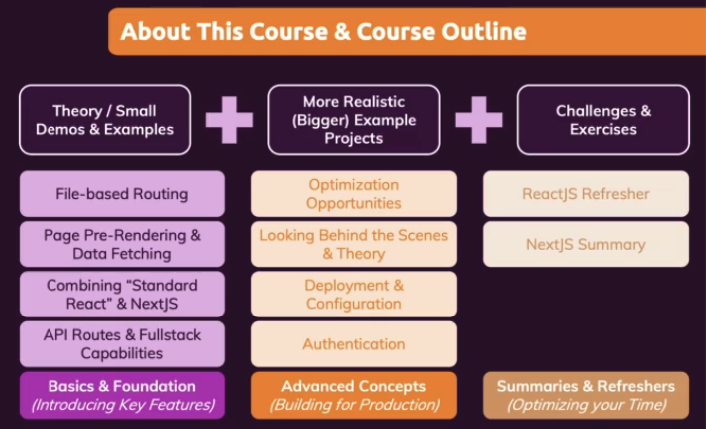
Next.js & React - The Complete Guide Note
This might be the longest course I've taken, maybe because of the transition of updating course between next js 13 to next js 14 so it has mixed content.
 madindo
Resources
https://academind.com/tutorials/connect-to-database/
https://academind.com/tutorials/building-a-restful-api-with-nodejs/

npx create-next-app@latest
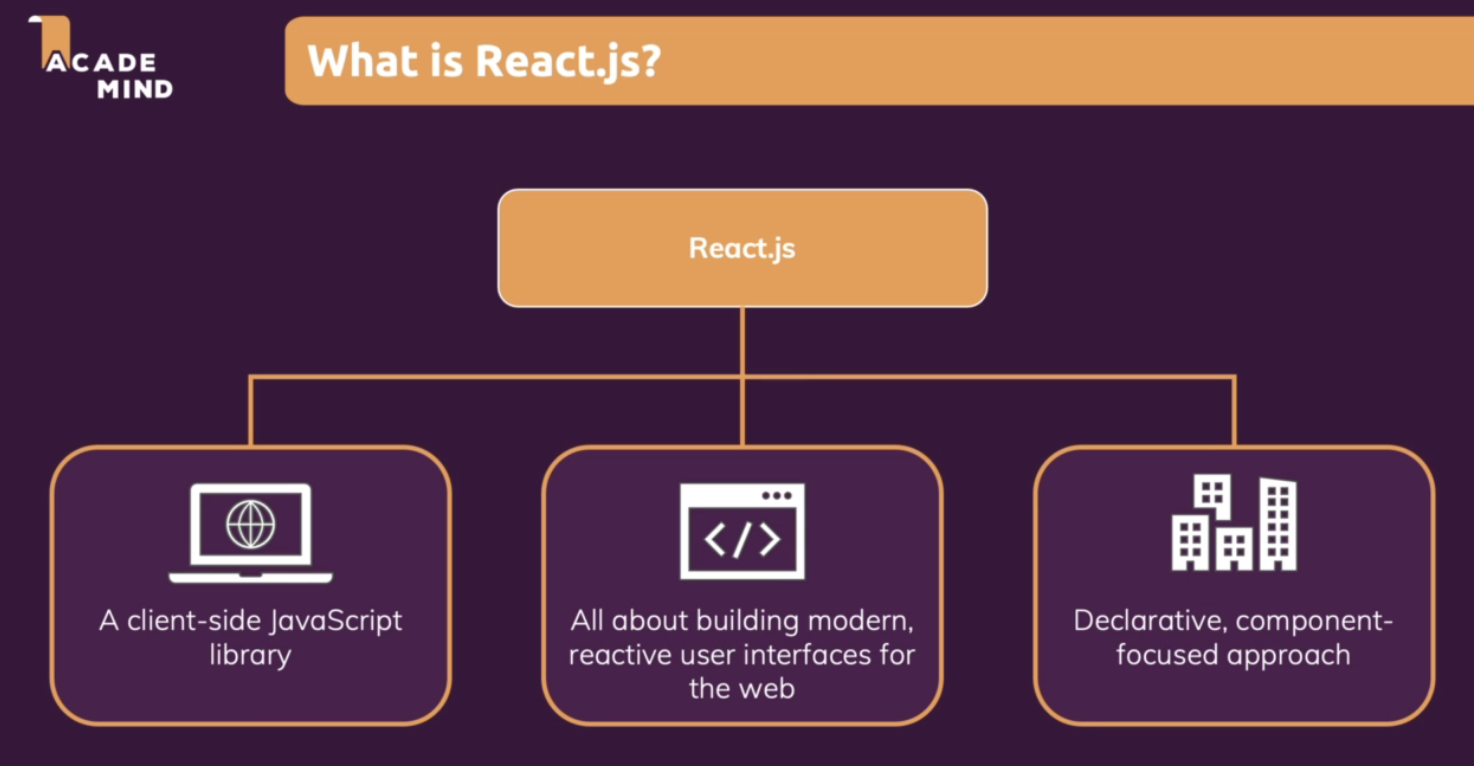
React Refresher
npx create-react-app react-course
// css = <https://raw.githubusercontent.com/mschwarzmueller/nextjs-course-code/c34af820285af1e7bfb3d0a0327168b5440125f6/src/index.css>
import Todo from "./components/Todo";
function App() {
  return (
    <div>
      <h1>My Todos</h1>
      <Todo text="Learn React" />
      <Todo text="Master React" />
      <Todo text="Explore the full react course"/>
    </div>
  );
}
export default App;
//components/Todo.js
import {useState} from 'react';
import Modal from './Modal';
import Backdrop from './Backdrop';

function Todo(props) {
  const [modalIsOpen, setModalIsOpen] = useState(false);
  function deleteHandler() {
    setModalIsOpen(true);
  }
  function closeModalHandler() {
    setModalIsOpen(false);
  }
  return (
    <div className="card">
      <h2>{props.text}</h2>
      <div className="actions">
        <button className="btn" onClick={ deleteHandler }>Delete</button>
      </div>
      { modalIsOpen && <Modal onCancel={closeModalHandler} onConfirm={closeModalHandler} /> }
      { modalIsOpen && <Backdrop onCancel={closeModalHandler} /> }
    </div>
  );
}
export default Todo;

//components/Backdrop.js
function Backdrop(props) {
  return <div className="backdrop" onClick={props.onCancel} />;
}
export default Backdrop;

//components/Modal.js
import { setState } from 'react';
function Modal(props) {
  function cancelModalHandler() {
    props.onCancel();
  }
  function confirmHandler() {
    props.onConfirm();
  }
  return (
    <div className="modal">
      <p>Are you sure?</p>
      <button className="btn btn--alt" onClick={cancelModalHandler}>Cancel</button>
      <button className="btn" onClick={confirmHandler}>Confirm</button>
    </div>
  );
}
export default Modal;
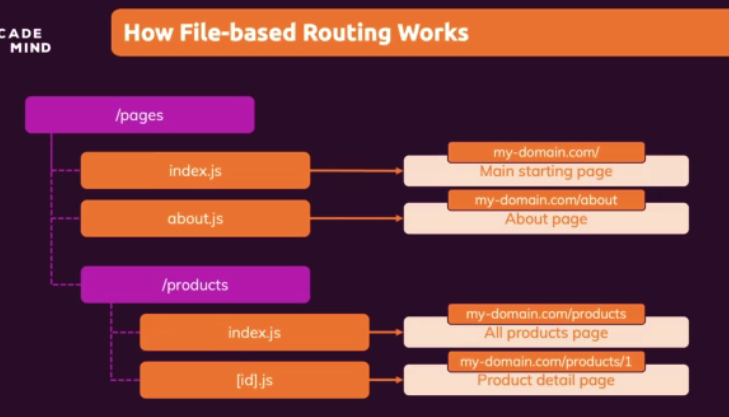
Routing
import { Route, Switch } from "react-router-dom"
import AllMeetups from "./pages/AllMeetups";
import NewMeetup from "./pages/NewMeetup";
import Favorites from "./pages/Favorites";
import MainNavigation from "./components/layout/MainNavigation";

function App() {
  return (
    <div>
			<MainNavigation />
      <Switch>
        <Route path="/" exact>
          <AllMeetups />
        </Route>
        <Route path="/favorites">
          <Favorites />
        </Route>
        <Route path="/new-meetup">
          <NewMeetup />
        </Route>
      </Switch>
    </div>
  );
}
export default App;

----

//component/Allmeetups.js
function AllMeetups() {
    return (
      <div>All Meetups</div>
    );
}
export default AllMeetups;

----

//component/Favorites.js
function Favorites() {
    return (
      <div>Favorites</div>
    );
}
export default Favorites;

----

//component/NewMeetup.js
function NewMeetup() {
    return (
      <div>NewMeetup</div>
    );
}
export default NewMeetup;

----

//component/MainNavigation.js
import { Link } from 'react-router-dom';
function MainNavigation() {
  return <header>
    <div>React Meetups</div>
      <nav>
        <ul>
          <li>
            <Link to="/">All Meetups</Link>
          </li>
          <li>
            <Link to="/new-meetup">New Meetups</Link>
          </li>
          <li>
            <Link to="/favorites">Favorites</Link>
          </li>
        </ul>
      </nav>
  </header>
}
export default MainNavigation;
Outputting list of data
const DUMMY_DATA = [
  {
    id: 'm1',
    title: 'This is a first meetup',
    image:
      '<https://upload.wikimedia.org/wikipedia/commons/thumb/d/d3/Stadtbild_M%C3%BCnchen.jpg/2560px-Stadtbild_M%C3%BCnchen.jpg>',
    address: 'Meetupstreet 5, 12345 Meetup City',
    description:
      'This is a first, amazing meetup which you definitely should not miss. It will be a lot of fun!',
  },
  {
    id: 'm2',
    title: 'This is a second meetup',
    image:
      '<https://upload.wikimedia.org/wikipedia/commons/thumb/d/d3/Stadtbild_M%C3%BCnchen.jpg/2560px-Stadtbild_M%C3%BCnchen.jpg>',
    address: 'Meetupstreet 5, 12345 Meetup City',
    description:
      'This is a first, amazing meetup which you definitely should not miss. It will be a lot of fun!',
  },
];
function AllMeetups() {
    return (
      <section>
        <h1>All Meetups</h1>
        <MeetupList meetups={DUMMY_DATA} />
      </section>
    );
}

----

import MeetupItem from './MeetupItem';
import classes from './MeetupList.module.css'

function MeetupList(props) {
  return (<ul className={classes.list}>
    {props.meetups.map(meetup => (
      <MeetupItem
        key={meetup.id}
        id={meetup.id}
        image={meetup.image}
        title={meetup.title}
        address={meetup.address}
        description={meetup.description}  />
    ))}
  </ul>)
}

export default MeetupList;

----

import classes from './MeetupItem.module.css'

function MeetupItem(props) {
  return (
    <li className={classes.item}>
      <div className={classes.image}>
        <img src={props.image} alt={props.title} />
      </div>
      <div  className={classes.content}>
        <h3>{props.title}</h3>
        <address>{props.address}</address>
        <p>{props.description}</p>
      </div>
      <div  className={classes.actions}>
        <button>Add to favorites</button>
      </div>
    </li>
  )
}

export default MeetupItem;
Creating wrapper component
import { Route, Switch } from "react-router-dom"
import Layout from "./components/layout/Layout";
function App() {
  return (
    <Layout>
    </Layout>
  );
}
export default App;

----

import classes from "./Layout.module.css";
import MainNavigation from "./MainNavigation";

function Layout(props){
  return <div>
    <MainNavigation />
    <main className={classes.main}>
      {props.children}
    </main>
  </div>;
}

export default Layout;
Making a form and send post request
import NewMeetupForm from "../components/meetups/NewMeetupForm";

function NewMeetupPage() {

		function addMeetupHandler(meetupData) {
      fetch(
        'https://*.asia-southeast1.firebasedatabase.app/meetups.json',
        {
          method: 'POST',
          body: JSON.stringify(meetupData),
          headers: {
            'Content-Type': 'application/json'
          }
        }
      );
    }

    return (
      <section>
        <h1>NewMeetup</h1>
        <NewMeetupForm />
      </section>
    );
}

export default NewMeetupPage;

---

import Card from "../ui/Card";
import { useRef } from 'react';

import classes from "./NewMeetupForm.module.css"
function NewMeetupForm(props) {
  const titleInputRef = useRef();
  const imageInputRef = useRef();
  const addressInputRef = useRef();
  const descriptionInputRef = useRef();
  function submitHandler(event) {
    event.preventDefault();
    const enteredTitle = titleInputRef.current.value;
    const enteredImage = imageInputRef.current.value;
    const enteredAddress = addressInputRef.current.value;
    const enteredDescription = descriptionInputRef.current.value;

    const meetupData = {
      title: enteredTitle,
      image: enteredImage,
      address: enteredAddress,
      description: enteredDescription,
    }
    props.onAddMeetup(meetupData);
  }

  return (
    <Card>
      <form className={classes.form} onSubmit={submitHandler}>
        <div className={classes.control}>
          <label htmlFor="title">Meetup Title</label>
          <input type="text" required id="title" ref={titleInputRef}/>
        </div>
        <div className={classes.control}>
          <label htmlFor="image">Meetup Image</label>
          <input type="url" required id="image" ref={imageInputRef} />
        </div>
        <div className={classes.control}>
          <label htmlFor="address">Address</label>
          <input type="text" required id="address" ref={addressInputRef} />
        </div>
        <div className={classes.control}>
          <label htmlFor="description">Description</label>
          <textarea id="description" required rows="5" ref={descriptionInputRef}></textarea>
        </div>
        <div className={classes.actions}>
          <button>Add new button</button>
        </div>
      </form>
    </Card>
  );
}

export default NewMeetupForm;
Navigating Programmatically
import { useHistory } from 'react-router-dom';

const history = useHistory();

history.replace('/');
useEffect
import { useState, useEffect } from "react";

const [isLoading, setIsLoading] = useState(true);
const [loadedMeetups, setLoadedMeetups] = useState([]);

useEffect(() => {
  setIsLoading(true);
  fetch('https://*.firebasedatabase.app/meetups.json')
    .then(response => {
      return response.json();
    }).then(data => {
      const meetups = [];
      for (const key in data) {
        const meetup = {
          id: key,
          ...data[key]
        };
        meetups.push(meetup);
      }
      setIsLoading(false)
      setLoadedMeetups(meetups)
    });
}, [])

if (isLoading) {
  return <section>
    <p>Loading..</p>
  </section>
}
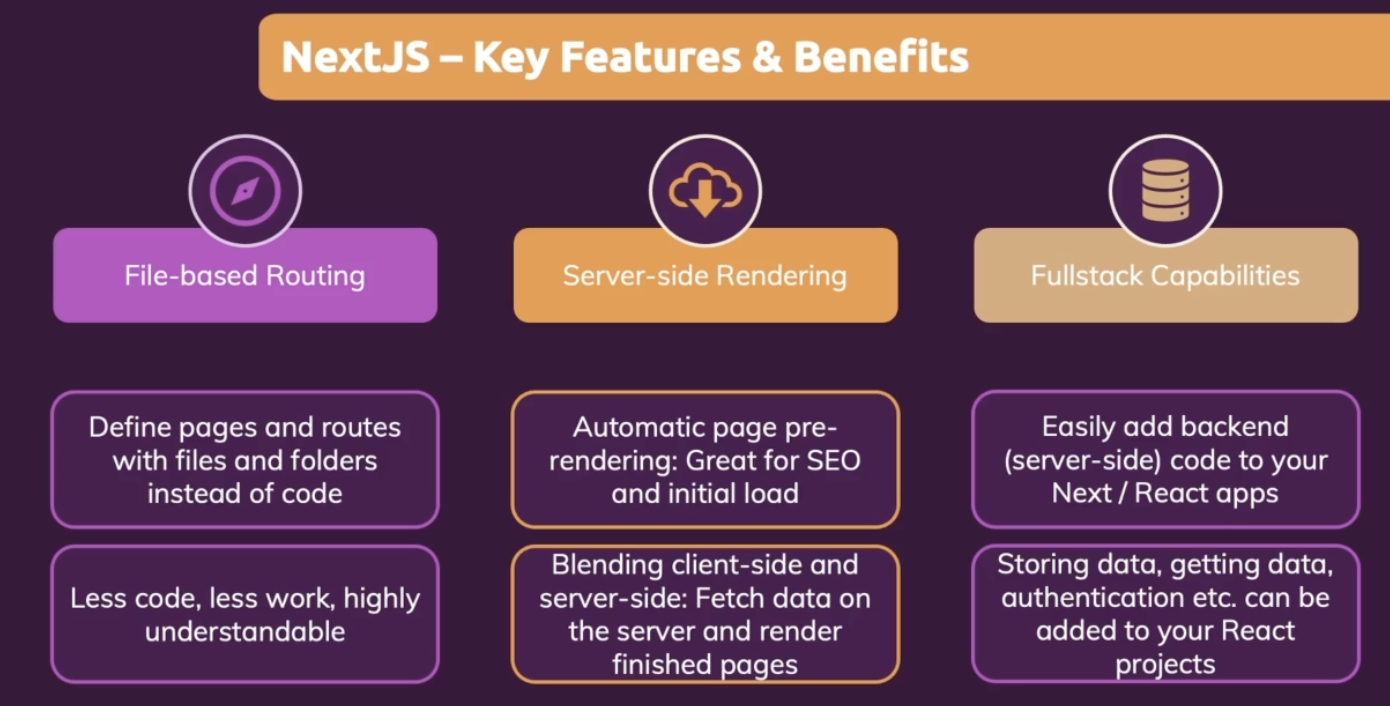
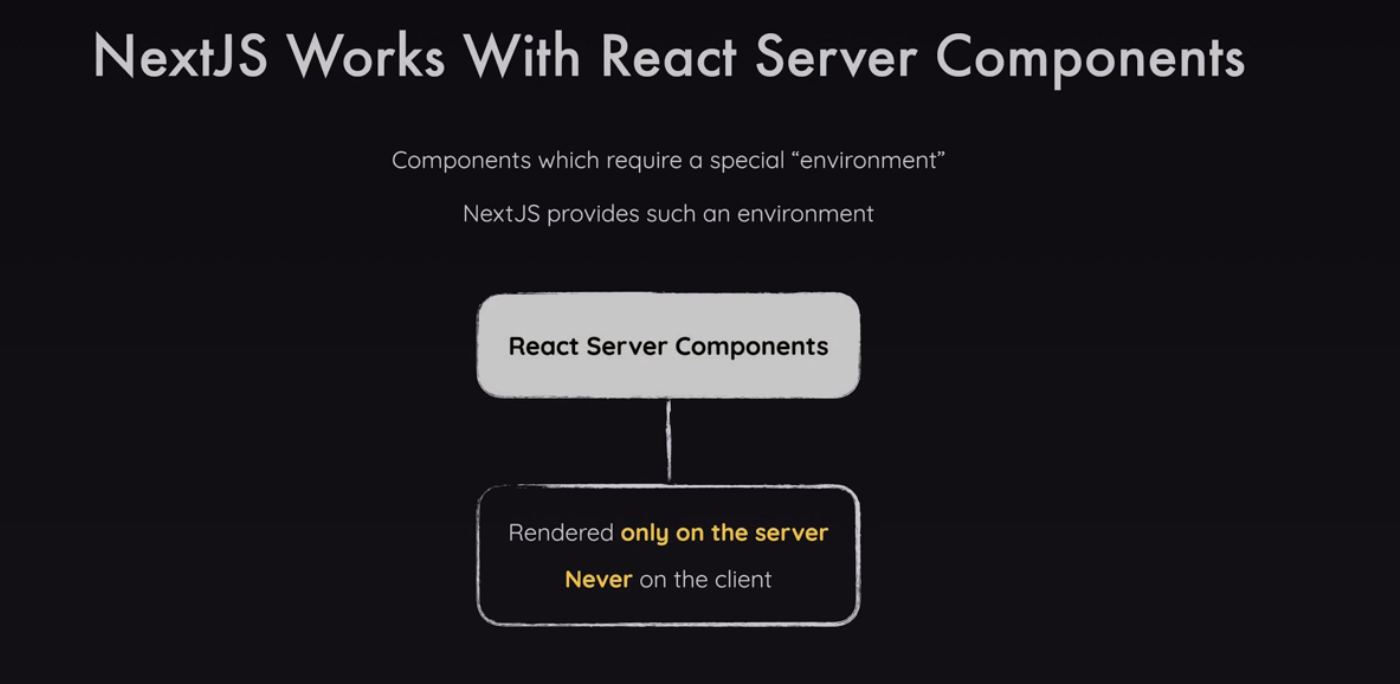
NextJS Essential

Reserved Filenames
As you already learned, there are some reserved filenames when working with NextJS.
Important: These filenames are only reserved when creating them inside of the app/ folder (or any subfolder). Outside of the app/ folder, these filenames are not treated in any special way.
Here's a list of reserved filenames in NextJS - you'll, of course, learn about the important ones throughout this section:
page.js=> Create a new page (e.g.,app/about/page.jscreates a<your-domain>/aboutpage)layout.js=> Create a new layout that wraps sibling and nested pagesnot-found.js=> Fallback page for "Not Found" errors (thrown by sibling or nested pages or layouts)error.js=> Fallback page for other errors (thrown by sibling pages or nested pages or layouts)loading.js=> Fallback page which is shown whilst sibling or nested pages (or layouts) are fetching dataroute.js=> Allows you to create an API route (i.e., a page which does NOT return JSX code but instead data, e.g., in the JSON format)
You also find a list with all supported filenames & detailed explanations in the official docs: https://nextjs.org/docs/app/api-reference/file-conventions

Storing Uploaded Images In The Cloud (AWS S3)
As explained in the previous lecture, storing uploaded files (or any other files that are generated at runtime) on the local filesystem is not a great idea - because those files will simply not be available in the running NextJS applications.
Instead, it's recommended that you store such files (e.g., uploaded images) via some cloud file storage - like AWS S3.
AWS S3 is a service provided by AWS which allows you to store and serve (depending on its configuration) files. You can get started with this service for free but you should check out its pricing page to avoid any unwanted surprises.
In this lecture, I'll explain how you could use AWS S3 to store uploaded users images & serve them on the NextJS website.
1) Create an AWS account
In order to use AWS S3, you need an AWS account. You can create one here.
2) Create a S3 bucket
Once you created an account (and you logged in), you should navigate to the S3 console to create a so-called "bucket".
"Buckets" are containers that can be used to store files (side-note: you can store any files - not just images).
Every bucket must have a globally unique name, hence you should become creative. You could, for example, use a name like <your-name>-nextjs-demo-users-image.
I'll use maxschwarzmueller-nextjs-demo-users-image in this example here.
When creating the bucket, you can confirm all the default settings - the name's the only thing you should set.
3) Upload the dummy image files
Now that the bucket was created, you can already add some files to it => The dummy images that were previously stored locally in the public/images folder.
To do that, select your created bucket and click the "Upload" button. Then drag & drop those images into the box and confirm the upload.
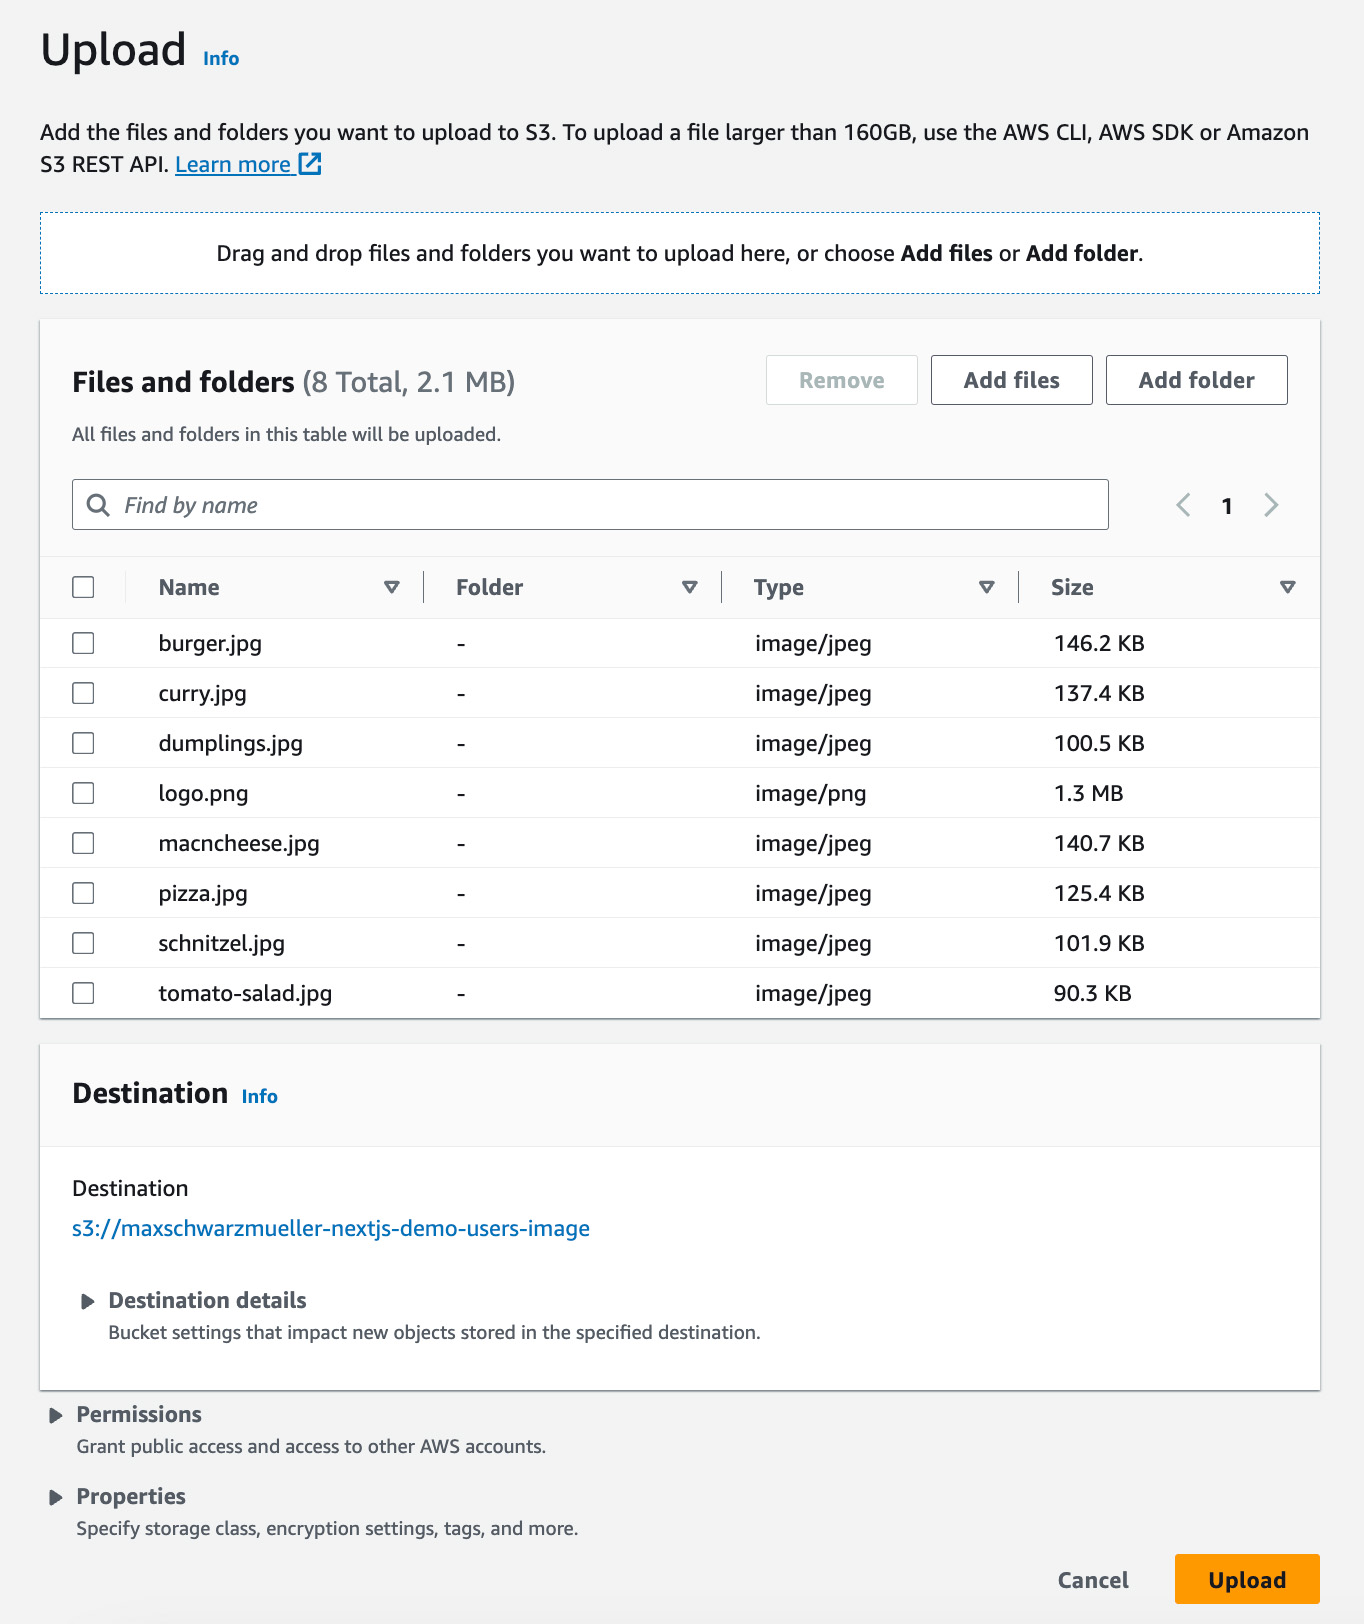
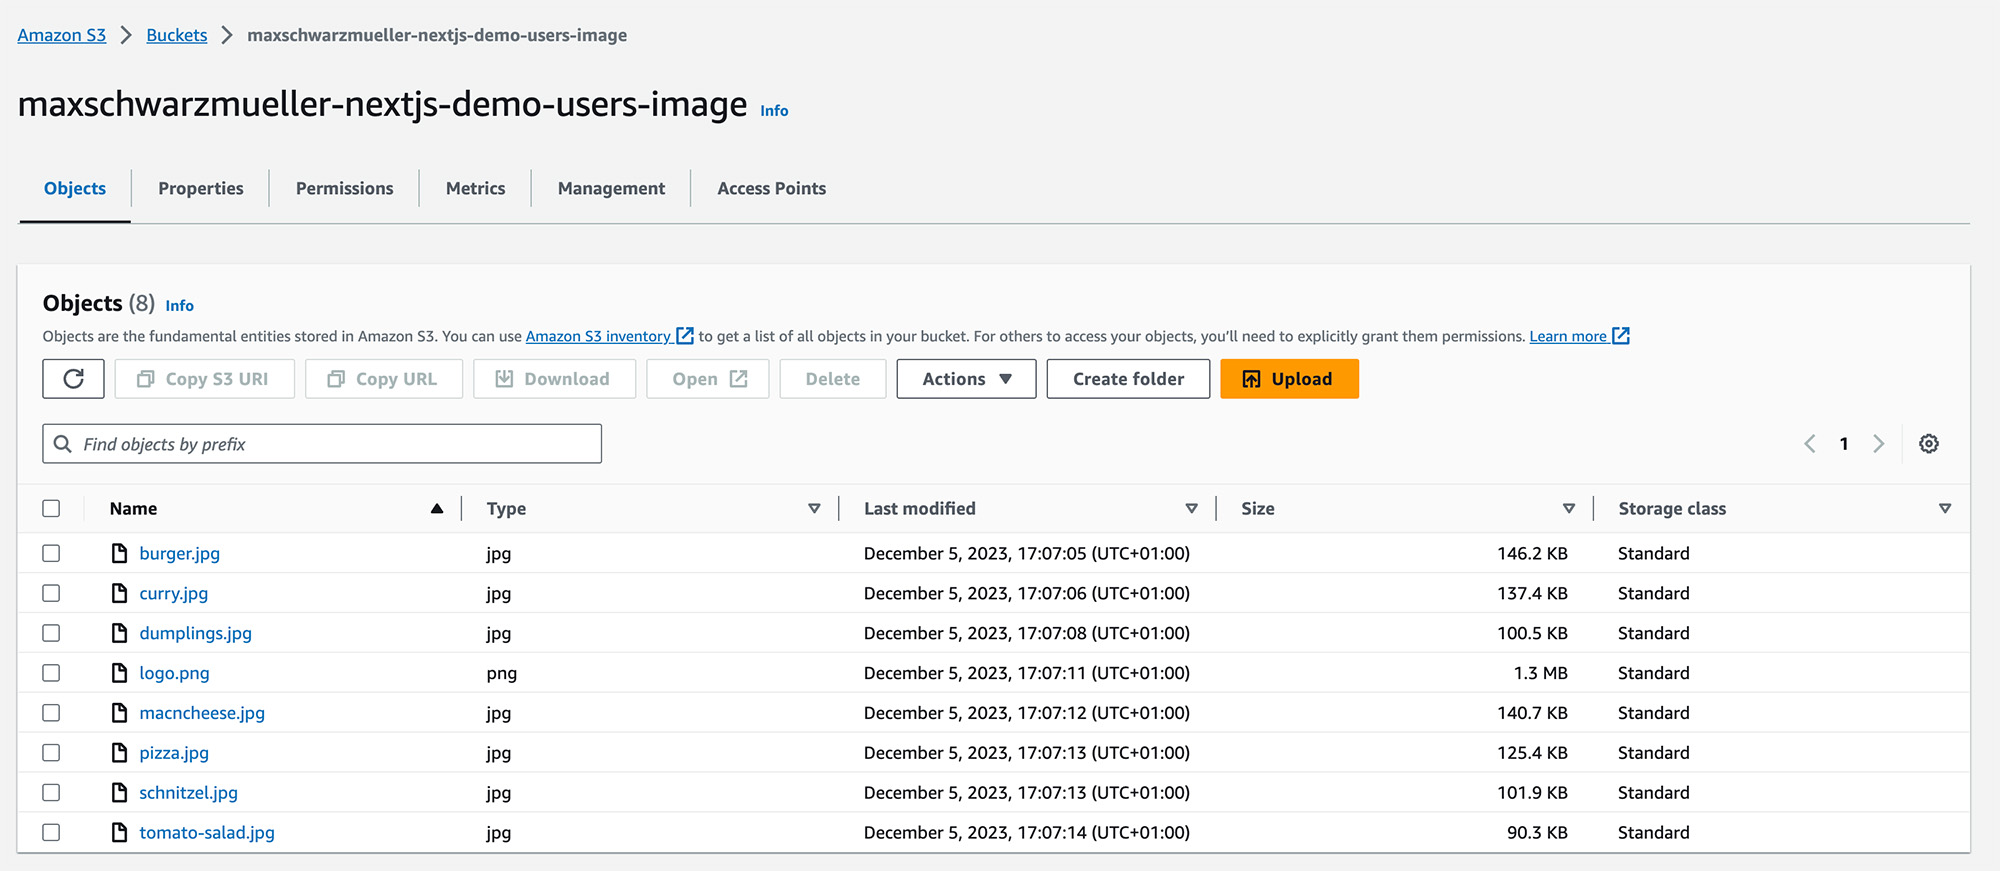
Thereafter, all those images should be in the bucket:
4) Configure the bucket for serving the images
Now that you uploaded those dummy images, it's time to configure the bucket such that the images can be loaded from the NextJS website.
Because, by default, this is not possible! By default, S3 buckets are "locked down" and the files in there are secure & not accessible by anyone else.
But for our purposes here, we must update the bucket settings to make sure the images can be viewed by everyone.
To do that, as a first step, click on the "Permissions" tab and "Edit" the "Block public access" setting:
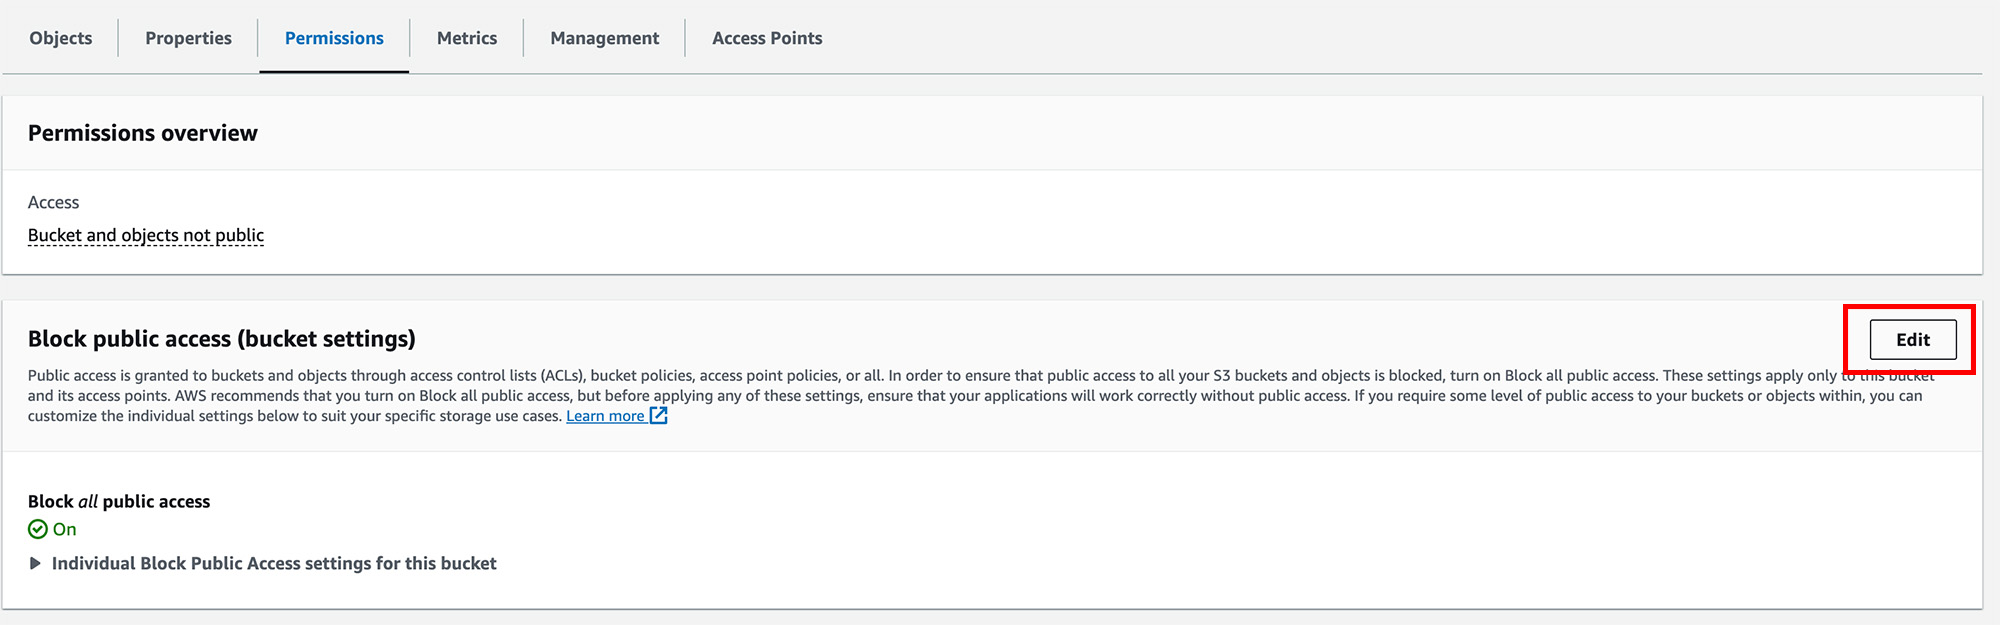
Then, disable the "Block all public access" checkbox (and with it, all other checkboxes) and select "Save Changes".
Type "confirm" into the confirmation overlay once it pops up.
That's not all though - as a next (and final step), you must add a so-called "Bucket Policy". That's an AWS-specific policy document that allows you to manage the permissions of the objects stored in the bucket.
You can add such a "Bucket Policy" right below the "Block all public access" area, still on the "Permissions" tab:
Click "Edit" and insert the following bucket policy into the box:
1. {
2.     "Version": "2012-10-17",
3.     "Statement": [
4.         {
5.             "Sid": "PublicRead",
6.             "Effect": "Allow",
7.             "Principal": "*",
8.             "Action": [
9.                 "s3:GetObject",
10.                 "s3:GetObjectVersion"
11.             ],
12.             "Resource": [
13.                 "arn:aws:s3:::DOC-EXAMPLE-BUCKET/*"
14.             ]
15.         }
16.     ]
17. }
1. {
2. "Version": "2012-10-17",
3. "Statement": [
4. {
5. "Sid": "PublicRead",
6. "Effect": "Allow",
7. "Principal": "*",
8. "Action": [
9. "s3:GetObject",
10. "s3:GetObjectVersion"
11. ],
12. "Resource": [
13. "arn:aws:s3:::DOC-EXAMPLE-BUCKET/*"
14. ]
15. }
16. ]
17. }Replace DOC-EXAMPLE-BUCKET with your bucket name (maxschwarzmueller-nextjs-demo-users-image in my case).
Then, click "Save Changes".
Now the bucket is configure to grant access to all objects inside of it to anyone who has a URL pointing to one of those objects.
Therefore, you should now of course not add any files into the bucket that you don't want to share with the world!
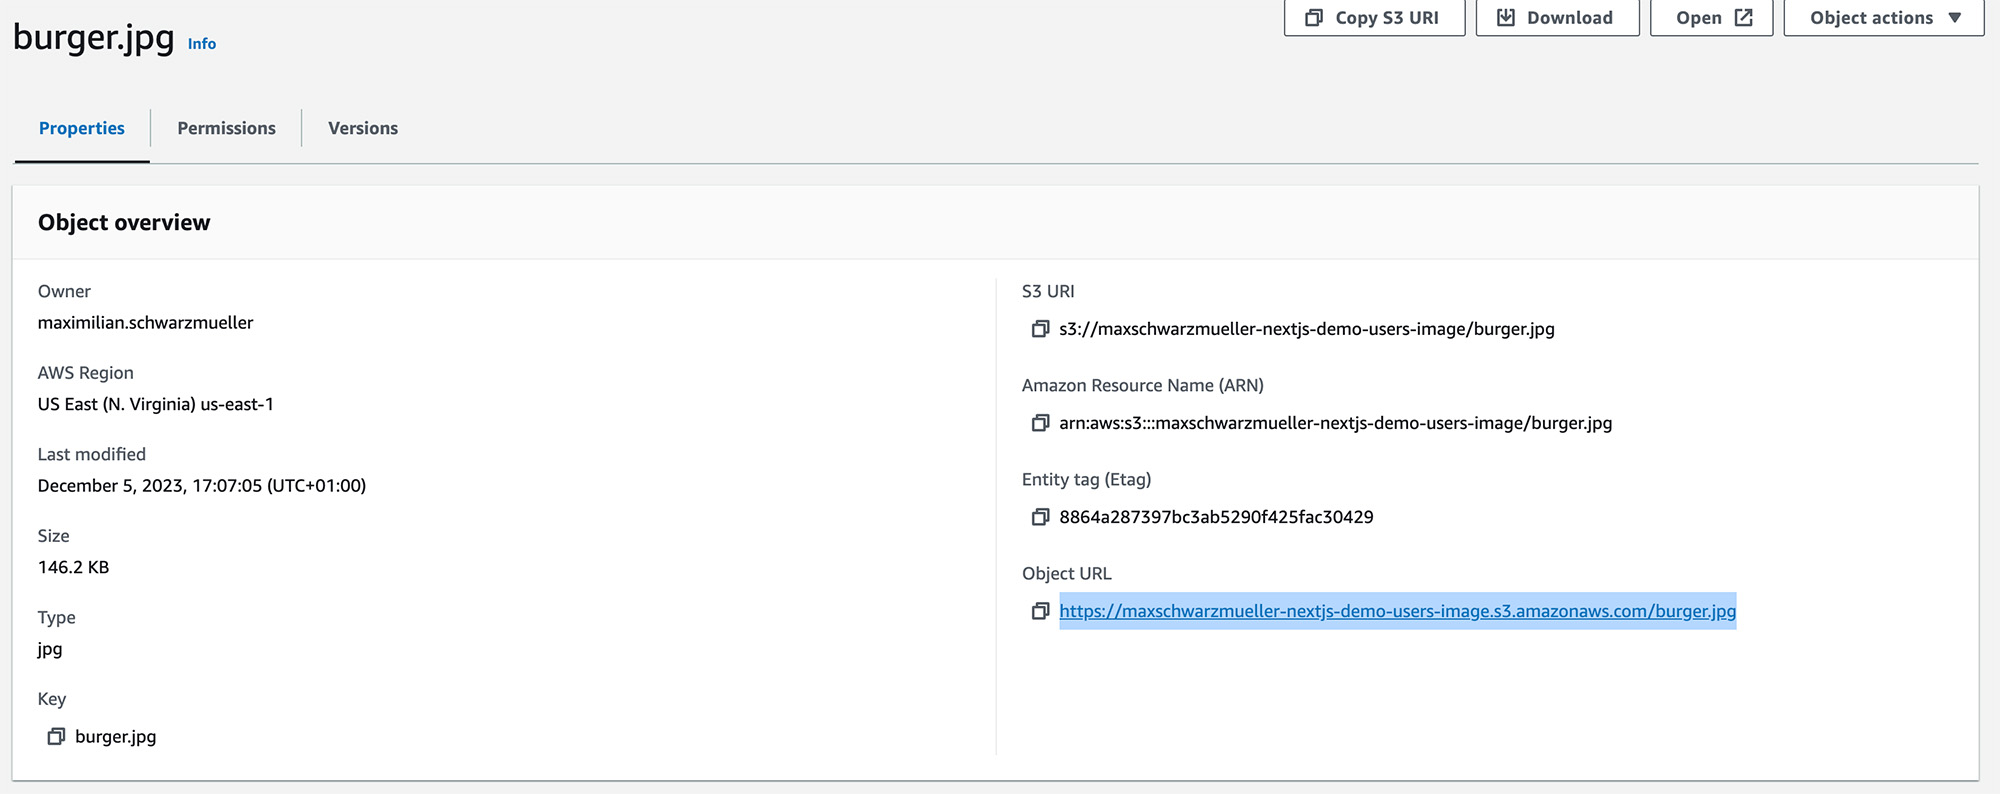
To test if everything works, click on one of the images you uploaded (in the bucket).
Then click on the "Object URL" - if opening it works (and you can see the image), you configured everything as needed.
5) Update the NextJS code to use those S3 images
Now that the images are stored + served via S3, it's time to also load them from there in your NextJS app.
As a first step, you can delete the public/images folder (so that an empty public/ folder remains).
Now, if you also delete the .next folder in the NextJS project and you then visit localhost:3000/meals, you should see a bunch of meals without images.
To bring them back, as a first step, edit the database data by updating the initdb.js file: Change all the image property values from image: '/images/burger.jpg', to image: 'burger.jpg' (and do that for all meals).
Alternatively, you find an updated initdb.js file attached.
Next, go to the components/meals/meal-item.js file (which contains the MealItem component) and update the <Image> src:
1. <Image
2.   src={`https://maxschwarzmueller-nextjs-demo-users-image.s3.amazonaws.com/${image}`}
3.   alt={title}
4.   fill
5. />
Of course, use your S3 URL / bucket name!
The new src value is a string that contains the S3 URL to your bucket objects (i.e., the URL you previously clicked for testing purposes - without the image file name at the end). The actual image name that should be loaded is then dynamically inserted via ${image}.
Note: This will only work if the images stored in the S3 bucket have the names referenced in the initdb.js file!
You should also update the app/meals/[mealSlug]/page.js file and make sure that the image on this page is also fetched from S3:
1. <Image
2.   src={`https://maxschwarzmueller-nextjs-demo-users-image.s3.amazonaws.com/${meal.image}`}
3.   alt={meal.title}
4.   fill
5. />
Of course, use your S3 URL / bucket name!
Now, to reset the database data, you should delete your meals.db file (i.e., delete the SQLite database file) and re-run node initdb.js to re-initialize it (with the updated image values).
If you do that, and you then restart the development server (npm run dev), you'll notice that you now get an error when visiting the /meals page:
Error: Invalid src prop (<https://maxschwarzmueller-nextjs-demo-users-image.s3.amazonaws.com/burger.jpg>) on next/image, hostname "maxschwarzmueller-nextjs-demo-users-image.s3.amazonaws.com" is not configured under images in your next.config.js``
6) Allowing S3 as an image source
You get this error because, by default, NextJS does not allow external URLs when using the <Image> component.
You explicitly have to allow such a URL in order to get rid of this error.
That's done by editing the next.config.js file:
1. const nextConfig = {
2.   images: {
3.     remotePatterns: [
4.       {
5.         protocol: 'https',
6.         hostname: 'maxschwarzmueller-nextjs-demo-users-image.s3.amazonaws.com',
7.         port: '',
8.         pathname: '/**',
9.       },
10.     ],
11.   },
12. };
Of course, use your S3 URL / bucket name!
This remotePatterns config allows this specific S3 URL as a valid source for images.
With the config file updated + saved, you should now be able to visit /meals and see all those images again.
7) Storing uploaded images on S3
Now that we can see those dummy images again, it's finally time to also "forward" user-generated (i.e., uploaded) images to S3.
This can be done with help of a package provided by AWS - the @aws-sdk/client-s3 package. This package provides functionalities that allow you to interact with S3 - e.g., to store files in a specific bucket.
Install that package via npm install @aws-sdk/client-s3.
Then, go to your lib/meals.js file and import the AWS S3 SDK (at the top of the file):
1. import { S3 } from '@aws-sdk/client-s3';
Next, initialize it by adding this line (e.g., right above the line where the db object is created):
1. const s3 = new S3({
2.   region: 'us-east-1'
3. });
4. const db = sql('meals.db'); // <- this was already there!
Almost there!
Now, edit the saveMeal() function and remove all code that was related to storing the image on the local file system.
Instead, add this code:
1. s3.putObject({
2.   Bucket: 'maxschwarzmueller-nextjs-demo-users-image',
3.   Key: fileName,
4.   Body: Buffer.from(bufferedImage),
5.   ContentType: meal.image.type,
6. });
Of course, use your S3 URL / bucket name!
Also make sure to save the image filename under meal.image:
1. meal.image = fileName;
The final saveMeal() function should look like this:
8) Granting the NextJS backend AWS access permissions
Now, there's just one last, yet very important, step missing: Granting your NextJS app S3 access permissions.
We did configure S3 to serve the bucket content to everyone.
But we did not (and should not!) configure it to allow everyone to write to the bucket or change the bucket contents.
But that's what our NextJS app (via the S3 AWS SDK) now tries to do!
To grant our app appropriate permissions, you must set up AWS access keys for your app.
This is done by adding a .env.local file to your root NextJS project. This file will automatically be read by NextJS and the environment variables configured in there will be made available to the backend (!) part of your app.
You can learn more about setting up environment variables for NextJS apps here: https://nextjs.org/docs/app/building-your-application/configuring/environment-variables.
In this .env.local file, you must add two key-value pairs:
1. AWS_ACCESS_KEY_ID=<your aws access key> 2. AWS_SECRET_ACCESS_KEY=<your aws secret access key>
You get those access keys from inside the AWS console (in the browser). You can get them by clicking on your account name (in the top right corner of the AWS console) and then "Security Credentials".
Scroll down to the "Access Keys" area and create a new Access Key. Copy & paste the values into your .env.local file and never share these keys with anyone! Don't commit them to Git or anything like that!
You can learn more about them here: https://docs.aws.amazon.com/IAM/latest/UserGuide/id_credentials_access-keys.html
With all that done, finally, you should be able to create new meals, upload images and see them on /meals. Even in production! Because now, the images are stored on S3!
You find the finished, adjusted code attached to this lecture. Please note that the .env.local file is not included - you must add it (and use your own credentials) if you want to run the attached code.
Repo
https://github.com/madindo/exercise_next/tree/main/05-foodies
<Link> & NextJS 13
Up to NextJS 13, you needed to add a nested <a> element in your <Link>s if you wanted to add custom attributes (e.g., className) to the anchor element.
For example, the following code would be wrong (with NextJS < v13):
1. <Link href="/" className="some-class"> 2. Click me 3. </Link>
Instead, you'd have to write this code:
1. <Link href="/"> 2. <a className="some-class"> 3. Click me 4. </a> 5. </Link>
The same solution would be required if you wanted to nest any other elements inside your <Link>. You would need to wrap them into an extra (potentially empty) <a> element:
1. <Link href="/"> 2. <a> 3. <span>Extra element</span> 4. </a> 5. </Link>
With NextJS 13 or higher, this is no longer needed, you can instead just write:
1. <Link href="/" className="some-class"> 2. Click me 3. </Link>
and
1. <Link href="/"> 2. <span>Extra element</span> 3. </Link>
The NextJS < 13 behavior will be shown in the next lecture, since that lecture was recorded before the release of NextJS 13.
If you are watching this course with version 13 (check your package.json file to find out), you can ignore my solution and simplify as described above (i.e., without the extra <a>).


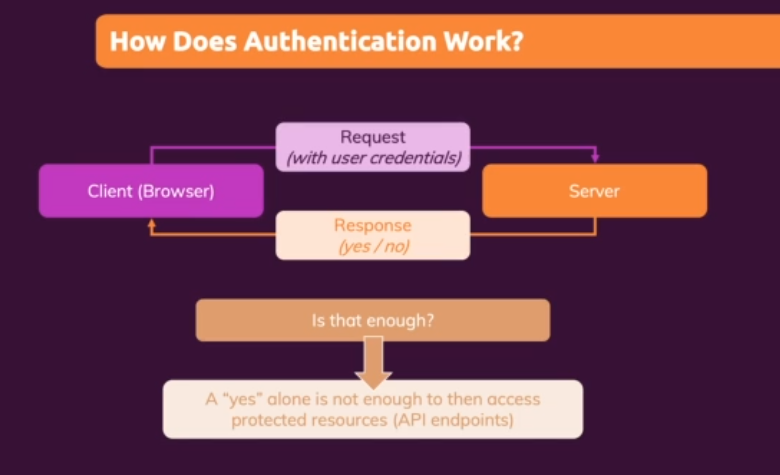
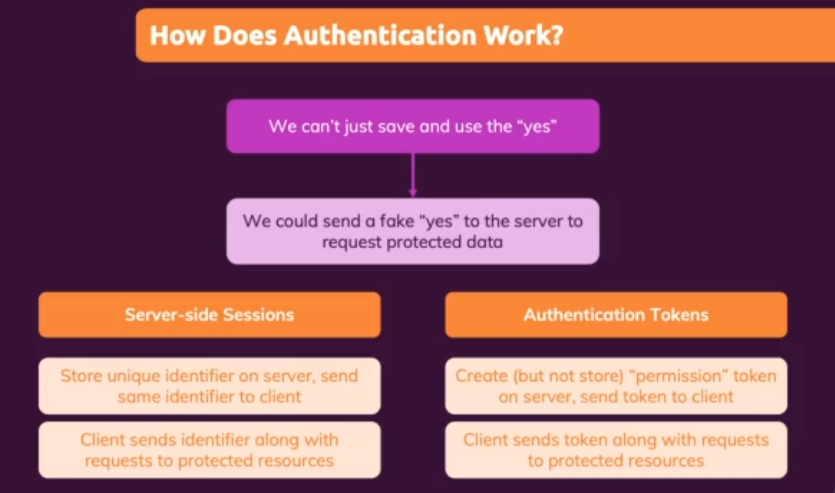
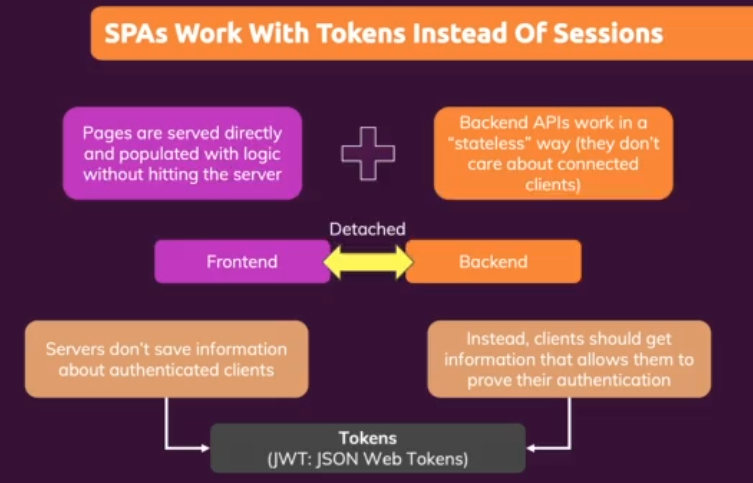
Authentication